

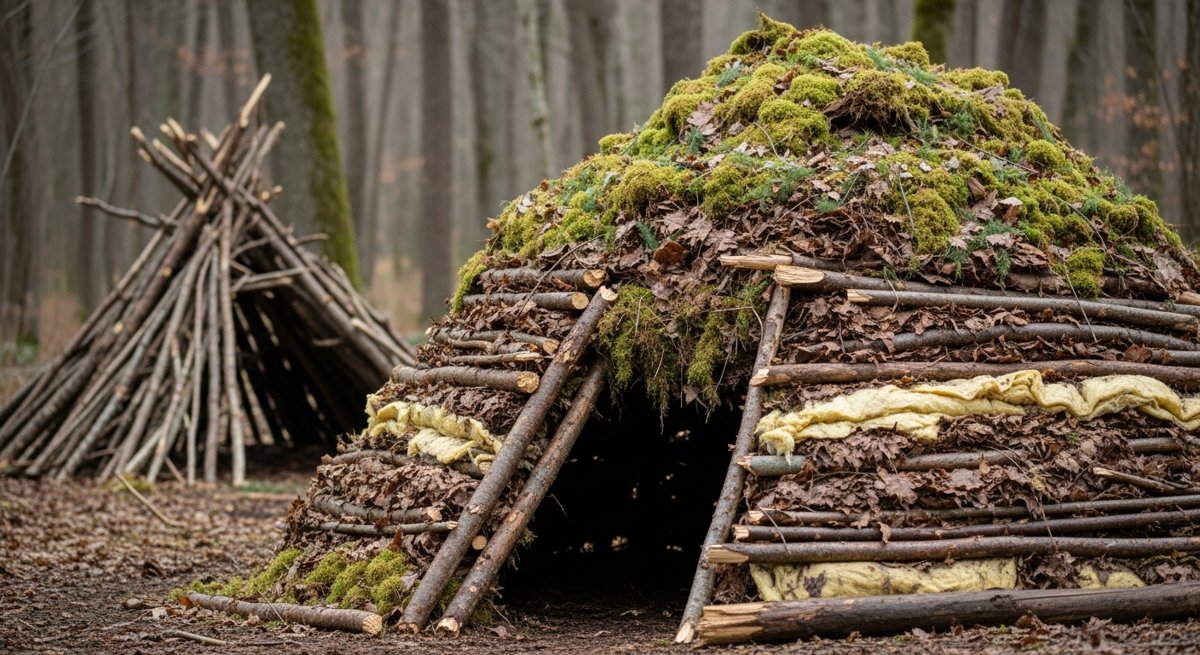
Quick truth: most of the “survival shelters” you see on YouTube would let you freeze to death by 3am. A flat lean-to with a thin layer of pine boughs is a wind break, not a shelter. If the temperature drops below 50°F and you don’t have a sleeping bag, that thing will kill you slowly through the night while you shiver, hallucinate, and lose the will to keep moving.
The debris shelter — done right — is different. It’s the closest thing to a sleeping bag you can build with nothing but your hands and what’s already on the forest floor. Built correctly, it’ll hold body heat down to about 20°F. I’ve slept in one in the high 30s with no bag, no fire, and a damp jacket. Woke up cold but alive. That’s the whole point.
Here’s how to actually build one. Not the version that looks pretty on Instagram — the version that works.
The Principle You Have to Understand First
A debris shelter is not about walls. It’s about trapped air. Your body is a 98.6°F heater pumping out roughly 100 watts continuously. The problem isn’t generating heat — it’s losing it. You lose heat four ways: conduction (cold ground sucking it out of you), convection (wind stripping it off your skin), radiation (your body glowing infrared into the dark), and evaporation (sweat, breath).
A debris shelter solves all four. The framework holds debris off your body. The debris itself — 2 to 3 feet of it — traps still air. Still air is the best insulator on Earth. It’s literally how down jackets work, how Thinsulate works, how every sleeping bag on the market works. You’re building a sleeping bag out of leaves.
Read that again: 2 to 3 feet of debris. Not 6 inches. Not “a good layer.” Knee-deep. If you can see daylight through the roof when you’re inside, you’re going to freeze.
Step 1: Pick the Right Spot (This Is Where Most People Screw Up)
You’re looking for four things, and you check them in this order:
- Dry ground. Not a low spot. Not a drainage. Not the bottom of a valley where cold air pools. Look for a slight rise with leaves already piled up — nature already told you where it drains.
- Debris within 30 feet. You’re going to make 20-40 armloads of leaves and pine needles. If your hauling distance is 100 yards, you’ll run out of daylight and energy before the shelter is done.
- Two trees, a forked branch, or a deadfall roughly 7-8 feet apart to support the ridgepole. Don’t have that? A single sturdy tree + one strong stick jammed in the ground works too.
- Not under widowmakers. Look up. Dead branches hung in living trees will kill you the one night you finally got warm.
Avoid: ridge tops (wind), valley bottoms (cold sink, water), anywhere near rotted trees, anywhere with a clear deer trail running through (you don’t want company at 2am).
Step 2: Build the Ridgepole and Frame
The ridgepole is the spine of the whole structure. Find a sturdy branch 1.5x your body length (so about 9-10 feet for most adults) and roughly wrist-thick. Not thumb-thick. Wrist-thick. It has to hold hundreds of pounds of wet leaves without bowing.
Prop one end up about 3 feet off the ground — in a tree fork, lashed to a tree, whatever works. The other end sits on the ground. You now have an angled spine, low end on the ground, high end at your hip when you sit. That low end is your foot end. The high end is your head end and entrance.
Critical sizing rule: the interior needs to be just barely big enough for you to fit. If you can sit up inside, it’s too big — your body can’t heat that much air. You should be able to roll over and that’s it. Coffin-sized. This feels wrong. Build it anyway.
Now lean ribbing sticks against the ridgepole on both sides, every 6-8 inches, angled at about 45°. These hold the debris off your body. Then weave smaller sticks horizontally across the ribs — basket-weave style — to create a lattice that leaves can’t fall through.
Step 3: Pile the Debris (Where Everyone Quits Too Early)
This is the work. Real work. Plan on 60-90 minutes of hauling leaves, pine needles, ferns, dry grass — anything fluffy and dry. Pile it on the frame until you have at least 2 feet of debris in every direction. Three feet is better. When you think you’re done, you’re halfway done.
Test it: push your arm into the pile from outside. If you can feel the frame, the debris is too thin. Keep piling. The shelter, when finished, should look like a giant pile of leaves with a small hole at one end. Not a tidy A-frame. Not a Boy Scout diorama. A messy, oversized leaf pile.
A common move: lay small branches over the pile after you’re done. Wind will strip the top layer otherwise, and one good gust at 1am will undo two hours of work.
Step 4: Stuff the Inside (The Step Almost Everyone Skips)
The ground will steal more heat from you than the air ever will. You need 6-12 inches of debris underneath you, packed into the interior of the shelter before you crawl in. Leaves, pine needles, dry grass — anything that compresses but still has loft.
Then, once you’re inside, you pull more debris in on top of yourself like a blanket. You’re going to crawl into a leaf pile and bury yourself. Your face stays exposed, everything else gets covered. This is where the magic happens — that’s the still-air sleeping bag I told you about. The shelter is the outer shell. The debris on top of you is the actual insulation.
Step 5: Plug the Door
Once you’re inside, you pull a “door plug” in behind you — basically a stuff sack of debris, or a small pre-made bundle of grass and leaves. Without it, the entrance is a chimney that vents all your warm air. With it, you’ve sealed the envelope. Build the plug before dark. You will not want to be making one at 11pm in the cold.
What This Costs You (Time and Calories)
A proper debris shelter takes 2-3 hours to build from scratch with no tools. It burns somewhere between 800-1500 calories. You need to start building no later than 3 hours before sunset, period. If you find yourself caught out at dusk and you haven’t started, you’re sleeping cold and you need to switch to plan B (fire and a wind break).
A small folding saw or even a sharp fixed-blade knife cuts the build time roughly in half. This is one of the cases where the right piece of gear matters — check out the survival gear in the BaseCampGoods shop if you don’t already have a real outdoor knife. A folding saw under 8 inches will save you more energy than any other tool in this scenario.
My Honest Opinion on When to Build One
Most people will never build a debris shelter for real. That’s fine. But you should build one once, in good weather, in your own woods or someone’s property where you have permission. Sleep in it for one night. Here’s why:
- You will learn that “shelter” doesn’t mean what you think it means.
- You will learn how much work it actually takes — and how badly you’d struggle to do it cold, wet, and tired.
- You will never again leave the truck without a decent jacket and a knife.
- You will respect a synthetic sleeping bag for the modern miracle it is.
Every serious outdoorsman I know has done this exercise at least once. It’s not because they expect to be lost in the woods. It’s because the experience recalibrates everything — how much gear matters, how much fitness matters, how thin the line really is.
The Five Most Common Mistakes
- Too big. Build it coffin-sized, not tent-sized. Your body can’t heat a room.
- Not enough debris. 2-3 feet on top. Not 6 inches. Not “a good layer.”
- No ground insulation. Cold ground will defeat you faster than cold air. 6-12 inches under you.
- Wet debris. Damp leaves are worse than no leaves. Brush off snow, shake out water, use dry stuff.
- No door plug. An open door is a chimney. Seal it.
Your Challenge This Weekend
Pick a Saturday in the next month. Go to your hunting lease, your buddy’s land, or a state forest that allows it. Spend three hours building a real debris shelter — coffin-sized, knee-deep debris, ground insulation, door plug. Then crawl in and stay in it for at least 30 minutes.
If you’re feeling froggy, sleep in it. Take a sleeping bag as a backup — you can leave it outside the shelter and only grab it if you genuinely need it. Most people who try this find they don’t.
The skill you can do on demand beats the gear you might forget. Build one shelter in good weather, and you’ll never panic about a cold night again.
Got questions about building your first one, or want to share how it went? Drop a comment below. We read every one.