

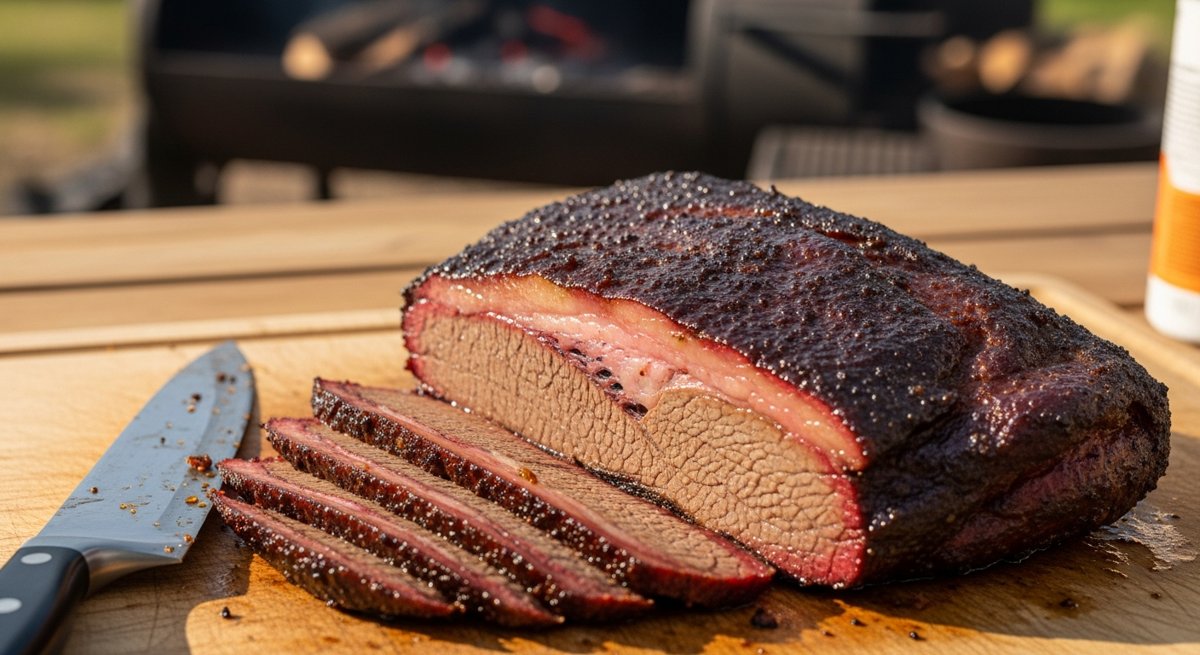
A great brisket isn’t a recipe. It’s a relationship. You spend fourteen hours with a piece of meat, and somewhere in hour eight you start having opinions about bark.
Here’s the truth nobody at the BBQ contest will tell you: smoking a brisket is one of the easiest things you’ll ever cook. The technique is simple. The variables are few. What people screw up is patience and panic — they peek too much, they crank the heat when it stalls, they slice it the wrong direction, and then they blame the smoker.
This is the guide I wish someone had given me before my first brisket (which was, for the record, a hockey puck of regret). Follow it and you’ll pull a 12-pound packer off the smoker that makes your neighbors find an excuse to come over.
What You Actually Need (And What You Don’t)
A smoker. That’s it. Offset, pellet, electric, kamado — doesn’t matter. Pitmasters will argue about this for hours and they’re all wrong, because brisket has been cooked over every kind of fire for 200 years and it still tastes great.
Other gear that actually matters:
- An instant-read thermometer. Not optional. Brisket is done by feel and temperature, not time. If you’re cooking by the clock, you’re going to lose.
- A leave-in probe thermometer. So you stop opening the lid every 20 minutes. Every peek costs you 15 minutes of cook time.
- Pink butcher paper (unwaxed). Foil works, but paper gives you better bark. Buy a roll — it’s eight bucks and lasts forever.
- A sharp boning knife. For trimming. A dull knife will turn a $90 brisket into ribbons of frustration.
- A cooler. For resting. Yes, a regular Yeti-style cooler. You’ll see.
What you don’t need: injectors, marinades, fancy rubs with 17 ingredients, spritz bottles full of apple juice, or the “Texas crutch” foil boat that’s having a moment on YouTube. Salt, pepper, smoke, time. That’s the assignment.
Step 1: Buy the Right Cut (This Is Where Most People Lose)
You want a whole packer brisket. 12 to 14 pounds, untrimmed, with both the flat and the point still attached. Costco sells these for around $4/lb in a Cryovac bag. Don’t buy just the flat — the point is where the magic lives, and the fat between them is what bastes the meat for 14 hours.
When you pick it up, do the floppy test: hold it horizontally by one end. A good brisket flops like a wet towel. A stiff one means more connective tissue you’ll have to render. Choose grade Choice or Prime if you can. Wagyu is a flex; you don’t need it.
Step 2: Trim (The Night Before, ~30 Minutes)
Take the brisket out cold — cold fat trims clean, warm fat smears. Lay it fat-cap up.
- Trim the fat cap down to about ¼ inch. Anything thicker won’t render and you’ll end up cutting flabby fat off slices later.
- Flip it over. Remove the hard chunk of fat between the flat and the point (the “deckle”). Get rid of any silverskin you see.
- Square off the corners and the thin edge of the flat. Those thin bits will dry out into jerky in hour 10. Save them for chili or trim tallow.
- Round the corners so they don’t burn.
You should lose 1.5 to 2.5 pounds in trim. That’s normal. Save the fat — we’ll render it into tallow later (more on that).
Step 3: Season (5 Minutes)
Central Texas dry rub. Equal parts by volume of coarse kosher salt and 16-mesh black pepper. That’s it. If you want to get fancy, add a tablespoon of garlic powder. If you want to get stupid, add anything else.
Slather lightly with yellow mustard or hot sauce first — it’s a binder, you won’t taste it. Season heavily. Both sides. Edges too. Refrigerate uncovered overnight if you can — it dry-brines the meat and gives you better bark.
Step 4: The Cook (Hour 0 to ~8)
Fire up the smoker to 225°F. Use post oak if you can find it. Hickory, pecan, or a 50/50 with oak also works. Avoid mesquite unless you like a kick to the teeth.
Brisket goes on fat-side up if your heat source is below (most pellet grills, kamados). Fat-side down if heat comes from above or the side. The point of this rule: protect the meat from direct radiant heat with the fat cap.
Now do the hardest thing in barbecue: leave it alone. No spritzing, no peeking, no “just checking.” Set your leave-in probe in the thickest part of the flat and walk away. Drink coffee. Mow the lawn. Stop opening the lid.
Around hour 6 to 8, your internal temp will hit roughly 165°F and stall. This is the famous “stall.” The meat is sweating and evaporative cooling is keeping the temperature flat. Do not panic. Do not crank the heat. This is when bark forms.
Step 5: The Wrap (Hour 8-ish)
When the bark is dark mahogany and feels set when you poke it — not tacky — it’s wrap time. Internal temp will be 165-175°F.
Lay out two big sheets of pink butcher paper, overlapped. Drizzle a few tablespoons of beef tallow on the paper (this is where the trim from Step 2 pays off — render it down on the stovetop while the brisket cooks). Place brisket fat-side down. Wrap tight, like a burrito. Put it back on the smoker.
Wrapping speeds up the cook and protects against drying out. Paper lets some moisture escape so the bark stays bark instead of turning to mush. Foil traps everything and you’ll get pot-roast brisket. Don’t do it.
Step 6: Cook to Probe-Tender (Hour 10-13)
Now you cook by feel, not temperature. Slide a probe or skewer into the thickest part of the flat. It should slide in like room-temperature butter. Total resistance: zero. Internal temp will usually be 200-205°F — but a brisket done at 198 is done, and one that’s tough at 207 isn’t done.
Probe in three spots. If all three glide, pull it. If any one feels tight, give it another 30 minutes.
Step 7: Rest (Minimum 2 Hours. I’m Serious.)
This is where 80% of home cooks blow it. They pull a perfect brisket, get excited, slice it 20 minutes later, and watch all the juice run onto the cutting board.
Leave it wrapped. Vent the paper for 15 minutes (crack it open to release steam — otherwise it’ll keep cooking and turn mushy). Then close it back up, wrap in an old towel, and put it in an empty cooler. Close the lid.
Rest for at least 2 hours. 4 is better. You can hold it like this for up to 6 hours and it’ll still be over 140°F. The resting time is non-negotiable — it’s when the muscle fibers relax and reabsorb the juices. Skip it and you’ve wasted 14 hours of cooking.
Step 8: Slice (Don’t Mess This Up)
Unwrap on a big cutting board. Separate the point from the flat — you’ll see the fat seam between them. The grain runs different directions in each piece, which is why slicing a whole brisket as one log is amateur hour.
- Flat: slice against the grain, pencil-thick (about ¼ inch).
- Point: rotate 90° (the grain runs perpendicular to the flat). Slice thicker, or cube it for burnt ends.
A perfectly cooked slice should hold its shape when you pick it up, then pull apart with the gentlest tug. You want a quarter-inch pink smoke ring just under the bark. Don’t add sauce. If someone asks for sauce, you may judge them silently.
The 5 Mistakes That Ruin 90% of Briskets
- Cooking by time instead of temp/feel. “1.5 hours per pound” is a lie. Cook to probe-tender.
- Cranking the heat during the stall. Trust the stall. It’s working.
- Not resting long enough. 2 hours minimum. Yes, even though it smells incredible.
- Slicing with the grain. Look at the meat fibers before you cook. Mark the grain direction with a knife notch.
- Trimming too little fat. Quarter-inch cap. No exceptions.
Your Challenge
This weekend, buy a packer brisket. Trim it Friday night. Put it on at 4 AM Saturday. Cook to probe-tender, rest in a cooler until dinner, and feed eight people for less than $50 worth of meat.
The first one might be a 7/10. The second one will be an 8. By your fifth, you’ll be the friend people text on Tuesday asking what you’re doing Saturday.
Salt. Pepper. Smoke. Time. That’s the whole game. Stop overthinking it.